
I returned to Dragontail Peak with John Guy to climb the Serpentine Arête (IV 5.8) in a day on June 8th, 2017. It’s hard to resist a mountain as intimidating and beautiful as this. This was my third time reaching the jagged summit at 8840′.
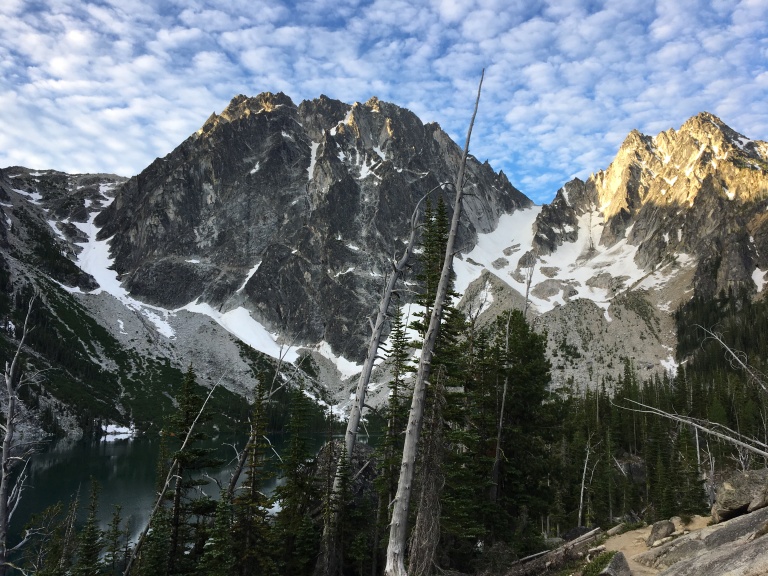
The Serpentine Arête is a massive rock ridge that slithers (sorry) out of the Colchuck Glacier, weaving 2000 feet upward to the summit of Dragontail Peak. The lower part of the ridge is the steepest, with several pitches of fun technical climbing. The upper part of the route is more moderate – I think Fred Beckey’s description of the upper ridge as “5.0” is spot on. There are definitely some interesting sections of climbing, but there are always enough holds to keep things reasonable. This terrain could justify rock shoes, but most will be happy to switch into approach shoes for this portion.

John and I left the Stuart Lake trailhead at 4am. The approach was uneventful and went quickly. We committed to doing the route car to car, remembering that it only took us 2 hours to reach Colchuck Lake when we climbed Prusik Peak. We followed the obvious moraine from the shores of the lake to just below the orange wall that marks the start of the climb. We were four hours into the day as I stepped onto the snow and instantly regretted my decision to leave crampons behind in an attempt to save weight.

The snow was very hard, but I quickly discovered that if I kicked hard enough, I could create just enough of a step in the snow to stand on. John put me on belay from the highest piece of exposed rock, and I slowly kicked steps up the slope, using my ice axe to stay balanced. This was pretty painful, because I was wearing light approach shoes. My toes screamed with each kick into the icy snow. Finally, I pulled up and over the lip of the moat between the frozen snow and perfect granite. I placed a directional cam for John and traversed leftward. After several attempts to continue climbing upward, I finally gave up and built an anchor to bring John up to my stance. John quickly followed my steps and took the lead up to the next ledge, where he belayed me up. From here, there was an obvious option to traverse left to reach easier terrain. However, there was an incredible looking dihedral above that simply begged to be climbed. I gladly took the lead and danced up the fun corner, which went at 5.7. I used all 70 meters of our rope along with some simulclimbing to reach a good belay stance, although there were many options.

John took the next two leads, charging up a pitch of low fifth class followed by another cool looking dihedral. We could have traversed to the right side of the ridge to find easier terrain, but John wisely insisted that this pitch was too good looking to pass. He floated confidently up the steep ground right off the belay and engaged the broken rocks in the corner. “I’m trying to be careful, but it’s kind of a china shop up here…” John warned. I swung to the right of the semi hanging belay, hoping that any falling rocks would miss me, but John transitioned onto face holds to the left without incident. When the holds ran out higher up on the face, he made an exciting traverse back into the dihedral proper before finishing the pitch at a ledge. The protection was great on this pitch, but there were loose rocks big enough to be a serious problem if they were to be dislodged.

I took us up another short pitch to the right side of the massive pillar. According to the guidebook descriptions, the couple of pitches next to the pillar are the hardest on the route. John led up the first pitch on strenuous finger locks in a splitter crack before switching to the right hand cracks. Above these, there was a fantastic hand crack in a right facing corner with a few solid chicken heads for footholds. Awesome! I took the lead on the next pitch, traversing leftward to a steep finger crack. This pitch was strenuous and I had to rest on gear a couple of times. I need to work on my finger crack skills! John lead up one more pitch that was supposedly 5.5 but felt just as hard as the crux pitches below. The route was now in full sun, and it was a HOT day. There was nothing we could do to escape the sweltering heat. I was much more comfortable when I climbed this mountain a few months ago in early Spring (cold) conditions.


So far, the route was surprising us with the amount of high quality, fun climbing. From here we could see that the ridge became somewhat lower angle with only occasional steep sections. We shortened the rope a bit and started swapping leads upward. There were a few steep spots where the leader would belay the follower, but otherwise we moved together until we were just below the summit. I slung a giant horn for an anchor and began belaying John. There was a snow patch on this ledge – I sat next to it and started greedily jamming the snow into the vents of my helmet. My brain had been getting cooked by the sun for hours and the cool snow finally provided some relief! I had been out of water for a while, so I dug a little deeper into the snow and started eating it to quench my thirst. I figured that it would be safe from almost all contaminants given that we were only 100 feet below the summit… I will find out for sure in a couple of weeks.
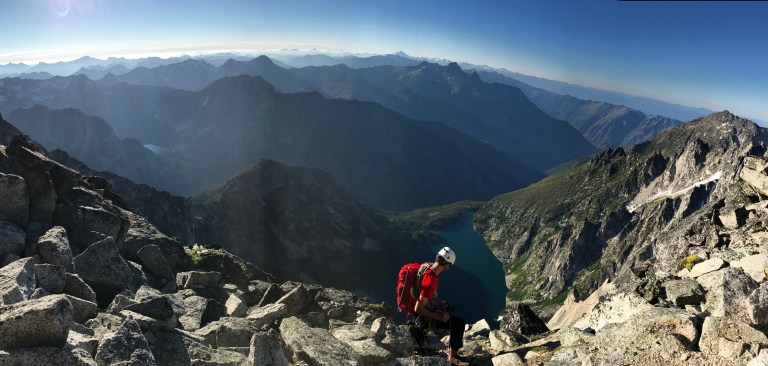

John took us on a traverse pitch underneath the summit to join the summit ridge. We stowed the rack and rope to scramble the final section to the summit. The views were incredible, but it was 8:30pm and we knew it would be dark soon. The day had gone smoothly so far, but it was about to take a turn for the worse.

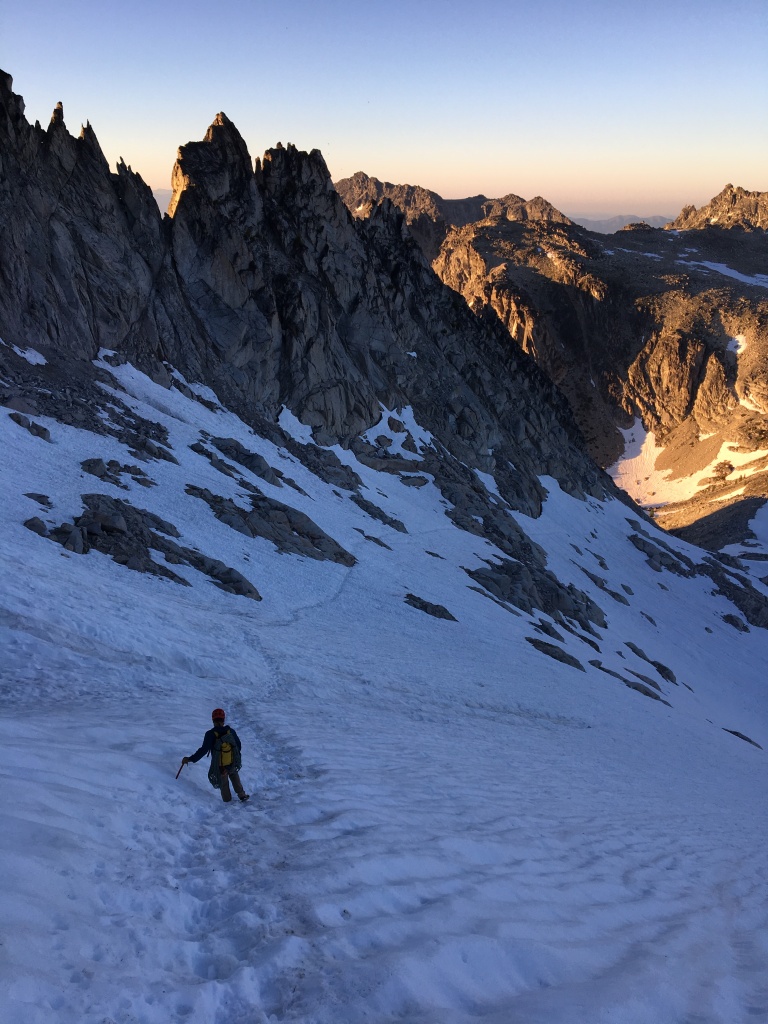
John and I descended a rocky slope to the south before angling east across the large snowfield that separated us from Aasgard Pass. Without crampons, we had to be extra careful descending this section and lost a lot of time. It was dark as we descended Aasgard Pass, and we lost the trail, costing us even more time. I hit a wall after 20 hours of near-constant motion, and had to dig deep to push forward. It was easily warm enough for us to simply lay down and rest for a few hours before finishing the hike out, but we talked ourselves out of it. Our sleep-deprived state played games with our heads. The hours slowly ticked by as we forced ourselves to continue putting one foot in front of the other. Finally, 24 hours after starting our “day,” we reached the trailhead.

This route was the biggest rock climb I’ve done, and the most demanding climb in general. It just seemed to stretch on forever – which was awesome! It felt good to confidently move upward and commit to such a big climb. This was only possible because John and I have a lot of trust in each other’s judgement and skills. I had to dig deeper than ever before to finish the hike to the car, and now I know that I can push fairly hard up to 20 hours while still feeling good. Next time I find myself crossing that line, I will try taking a short nap if conditions allow it. I think that the time spent stationary is worth if you find yourself on that much of a death march. We took 12 hours on route, slower than I anticipated.
Gear Notes
We brought doubles of cams sized .4-2 with singles of .2, .3 and 3, a light set of nuts, and numerous long slings and alpine draws. This was the perfect rack for this climb, although we could have easily done without the .2 cam. I suggest bringing at least four double length slings. John and I tried carrying all of our alpine draws and slings on a shoulder sling – it was awesome! Belay transitions were really fast and organization was easy. We used a 70m rope and stretched the whole thing out multiple times. Bring an ice axe and some light crampons.
Strategy Notes
Although doing this route car to car made for a very long day, I think it is reasonable for a fast party. A more reasonable option is to spend one night at the lake, perhaps after doing the route. However, this requires getting your hands on a coveted Colchuck Lake camping permit – good luck.

Nice work sir. I love that place but was a bit put off by loose rock on the upper half of that route. My partner and I simuled all but the black pillar pitches. As I led the upper parts I was never really afraid of falling myself but I was very concerned about pulling off or having the rope knock of blocks which would have cascaded down, taking out my partner and/ or the other party right below us. If I were to ever do it again I might think soloing that part would actually be the safest in aggregate. What was your experience with this? I know with alpine rock you get what you get. I’m just thinking through the best way to manage risk for everyone in that situation.
LikeLike
Thanks! I thought that simulclimbing the upper section was ideal, and on the path we took there was little loose rock except for the largest ledges. That said, I know of one serious rockfall accident this year on the neighboring Backbone Ridge, so you’re wise to consider loose rock and its consequences. Soloing would probably be the safest method in terms of mitigating rockfall, but I definitely wanted a rope on for some parts (we stuck to the ridge crest and had some fifth class climbing on the upper section). I thought this was a good route, but I doubt I’ll ever repeat it.
LikeLike
Hey thanks for the write-up! I’m doing this route soon and have a few questions.
1) Are your pictures in order as far as the text above and below it? Specifically, the picture of John above a broken dihedral that says “5th pitch”- is that the 2nd 5.8 crux pitch that you mention has chickenheads for feet? The guide says 4 and 5 are the cruxes, but the picture I’m asking about comes before your text (and accompanying picture) that talks about the two crux pitches. Curious if the crack pictured is before the cruxes, or just out of order!
2) How long was the steep fingercrack that gave you trouble? Was this the pitch right after the two 5.8 cruxes? I’ve got giant hands/fingers, so this is particularly worrisome for me, as I HATE tips jams…
3) As you can tell, I’m very interested in how easy was the climbing to gain the huge ledge with the pinnacle (just before the 2 crux pitches). Was it pretty straightforward or easy to get off route? You mentioned giving up and belaying your partner up, so wondering how much trouble it might give me…
LikeLike
Hi Josh, the photos should be in order! This was several years ago so it’s tough to remember the minute details. I wouldn’t stress too hard on pitch-by-pitch descriptions for big alpine rock climbs like this – the actual pitch numbers will be different for each party based on their chosen rope length, rack size, experience, and routefinding decisions. The finger crack is only 5.5, so don’t worry about it! Be safe, and have fun. Dial in your simulclimbing for the upper half and you’ll have a blast.
LikeLike