
John and I climbed the Direct North Ridge of Mount Stuart on a “leisure” schedule from June 21-23, 2020. It was the culmination of years of honing my mountain craft in the Cascades and abroad; this one meant a lot! The journey started in 2016, when I saw Stuart in person for the first time from Colchuck Peak. I was spellbound by the rugged beauty of the mountain with its springtime coating of snow and ice, making the North Ridge even more dramatic as it soared directly to the summit.
It is possible to climb the North Ridge using an “abbreviated” start, gaining the ridge crest at half-height via a rocky gully rising from Stuart Glacier – this version of the route is included as one of the “50 Classic Climbs of North America” and it’s said that this is the most commonly climbed version. To me, a direct start climbing directly from the toe of the ridge creates a much more pure, aesthetic and logical line to the summit. The Direct North Ridge instantly became my goal. Three months later after I first laid eyes on it, John and I made the Southern approach via Ingalls Creek for an attempt on the route. Cresting Goat Pass, we stopped to stare at the route in profile. The scale of the climb was jaw-dropping; we quickly turned around and went home. We were not ready and we knew it, but we made other excuses.

Four years and many climbs went by before John and I decided that it was time to put this project to bed. This time, we trudged up Mountaineer’s Creek to Mount Stuart. Swarming insects, brutal heat, boulder hopping and off-trail bushwhacking brought us to our plush back country campsite below Stuart’s Northern aspect. A few other climbers passed by our camp on their way out; they were the last people we would see for two days. We had the entire valley, and mountain, to ourselves. Cheers to weekday alpinism!

With the Summer Solstice only two days prior, we had a long day of daylight on our side. Planning to blast the route and descent in a single push from camp, the route was already in full sun as we started hiking up the moraine at 5:30am. John volunteered to lead the first pitch, which was a great warmup for the day. The “slot” on this pitch is as awkward as people say… hang the leader’s pack off of a cam below the slot and belay just above. The leader can lower a loop of rope to the follower and haul the packs past the slot.

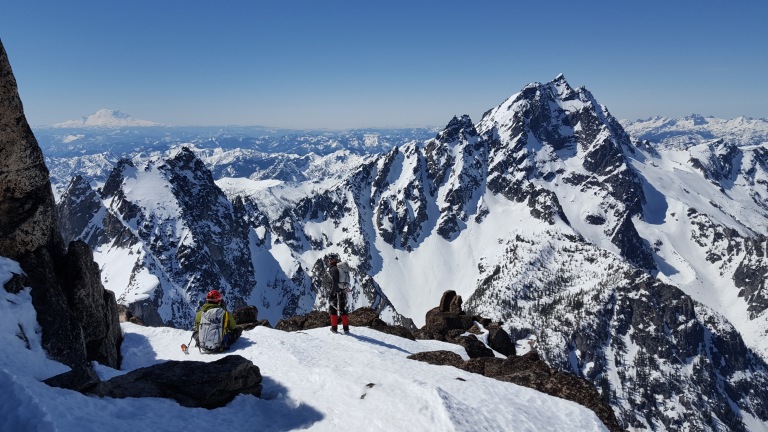
I took point on the uneventful second pitch and John fired the 5.9+ third pitch, the hardest pitch on the climb. After a fourth belayed pitch (perhaps 5.7), we changed gears to simulclimbing mode. This part of the climb was truly a gift, featuring moderate climbing and unbeatable alpine ambiance. Rock and ice thundered down Ice Cliff Glacier every few minutes, reminding us that the mountain is always in charge. Our staircase of clean granite carried us 1600 feet higher into the cobalt sky.


After a few hours, I lead over a high point in the ridgeline and felt my stomach drop. I was looking at the well-known and typically easy “slab with crack” pitch, but it was partially covered in snow and ice. There were no signs of prior passage and I questioned whether or not I would be able to climb it in these conditions. I quickly realized that I had to give the pitch my absolute best effort – bailing from this high on the ridge would be an absolute nightmare. The mountain was testing us even more than I expected.

I cautiously led up the pitch, placing a solid cam a few feet below the snow patch before strapping my pathetic, worn-down aluminum crampons on my approach shoes. Evaluating the snow patch, I realized that it consisted of about 1 inch of ice against the rock with a couple of inches of snow on top. My ultralight ice axe would not be able to excavate the crack to place protection. The first few feet were the thinnest, and I willed the snow patch to stay attached to the mountain. With full commitment, I stepped onto the ice and quickly power-stepped my way up, trying to maintain my upward momentum. Racing to the top, I slapped my hands on the lip and mantled to a perfect belay stance.

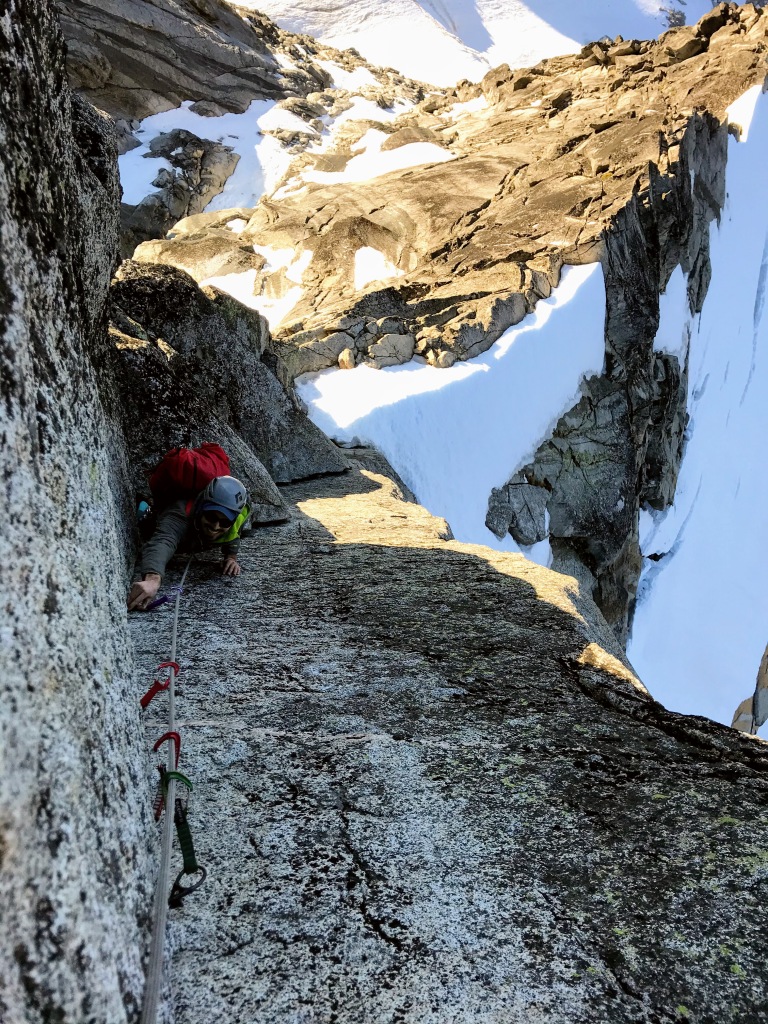
The rush was on as the sun neared the horizon, bathing the Great Gendarme in a warm glow. This stunning tower of granite holds the crux pitches of the upper route. I lead the first pitch of amazingly clean, solid finger crack, mantling up to an all-time belay perched atop a detached pillar with thousands of feet of exposure below. John took the next pitch, traversing slightly wet rock to the 5.9 fist crack which held a couple of conveniently fixed pieces. It was 9pm by the time I reached John’s belay anchor and we made peace with the fact that we would be reaching the summit in total darkness.


The final section of mid-fifth class climbing was still very snowy. Several miserable pitches with snow blocking the easiest route cost us a lot of time. Since it was dark already, we chose not to hurry, shifting our focus to finding the safest route among the snow and loose rock. Several times, I found myself at a dead-end, requiring me to reverse the last few moves and find another way. This was crushing in my exhausted state! We pulled onto the summit at 11:30pm as the temperatures dropped. Regardless, I was incredibly happy and felt no stress about our situation, just focus and joyful resolve. We could handle this. The night sky was ablaze with stars and I was living my ideal atop this massive, complex peak.


We began toiling our way down the East Ridge on snow, then 4th class rock, and then a lot more snowy rock. It was extremely slow going in the dark and we settled in for a short bivouac once we found a good platform. Bouts of violent shivering and continual harassment from the local snafflehounds provided entertainment until the sun rose again. In the morning, we continued traversing the East Ridge and descended the Sherpa Glacier, which was a tedious but straightforward descent option. The hike out to the car was quite the death march, but it always seems that way!

Strategy Notes
Hiking in from the North is a great choice in early season, which seems to be June through mid July for this route. The Sherpa Glacier is a mellow and straightforward descent this time of year. I have agonized over the different approach and descent options for the last 4 years, so I’ll make a generalization with which choice is best. Take the North/Mountaineer’s Creek approach and Sherpa Glacier descent if you are climbing early season. Later in the year, come in from the South/Ingalls Creek and use the Cascadian Couloir descent.
Gear Notes
The rack was a set of nuts, a single .3 and doubles .4-3. Lots of long slings are key for routes that involve a lot of simulclimbing. I wore climbing shoes on the harder pitches and approach shoes for everything else, with aluminum crampons and an axe for the Sherpa descent.


Really nice post and looks like a great climb!
Very nice photos too.
LikeLiked by 1 person
Super Rad!
LikeLiked by 1 person
Nice shots! Here s a fun fact. The elevation difference between Leavenworth and the summit of Mt Stuart is 700 ft greater than the elevation difference between Jackson and Grand Teton.
LikeLiked by 1 person