John Guy and I climbed the NE Rib of Johannesburg Mountain on August 1-2, 2020. I have never climbed a route where the technical grade is as meaningless as it is on this route. While the rock climbing is firmly in the “easy” category, there are numerous other factors that make this a properly challenging and sometimes scary route. Steady nerves and straight-up hardiness will serve you well here.
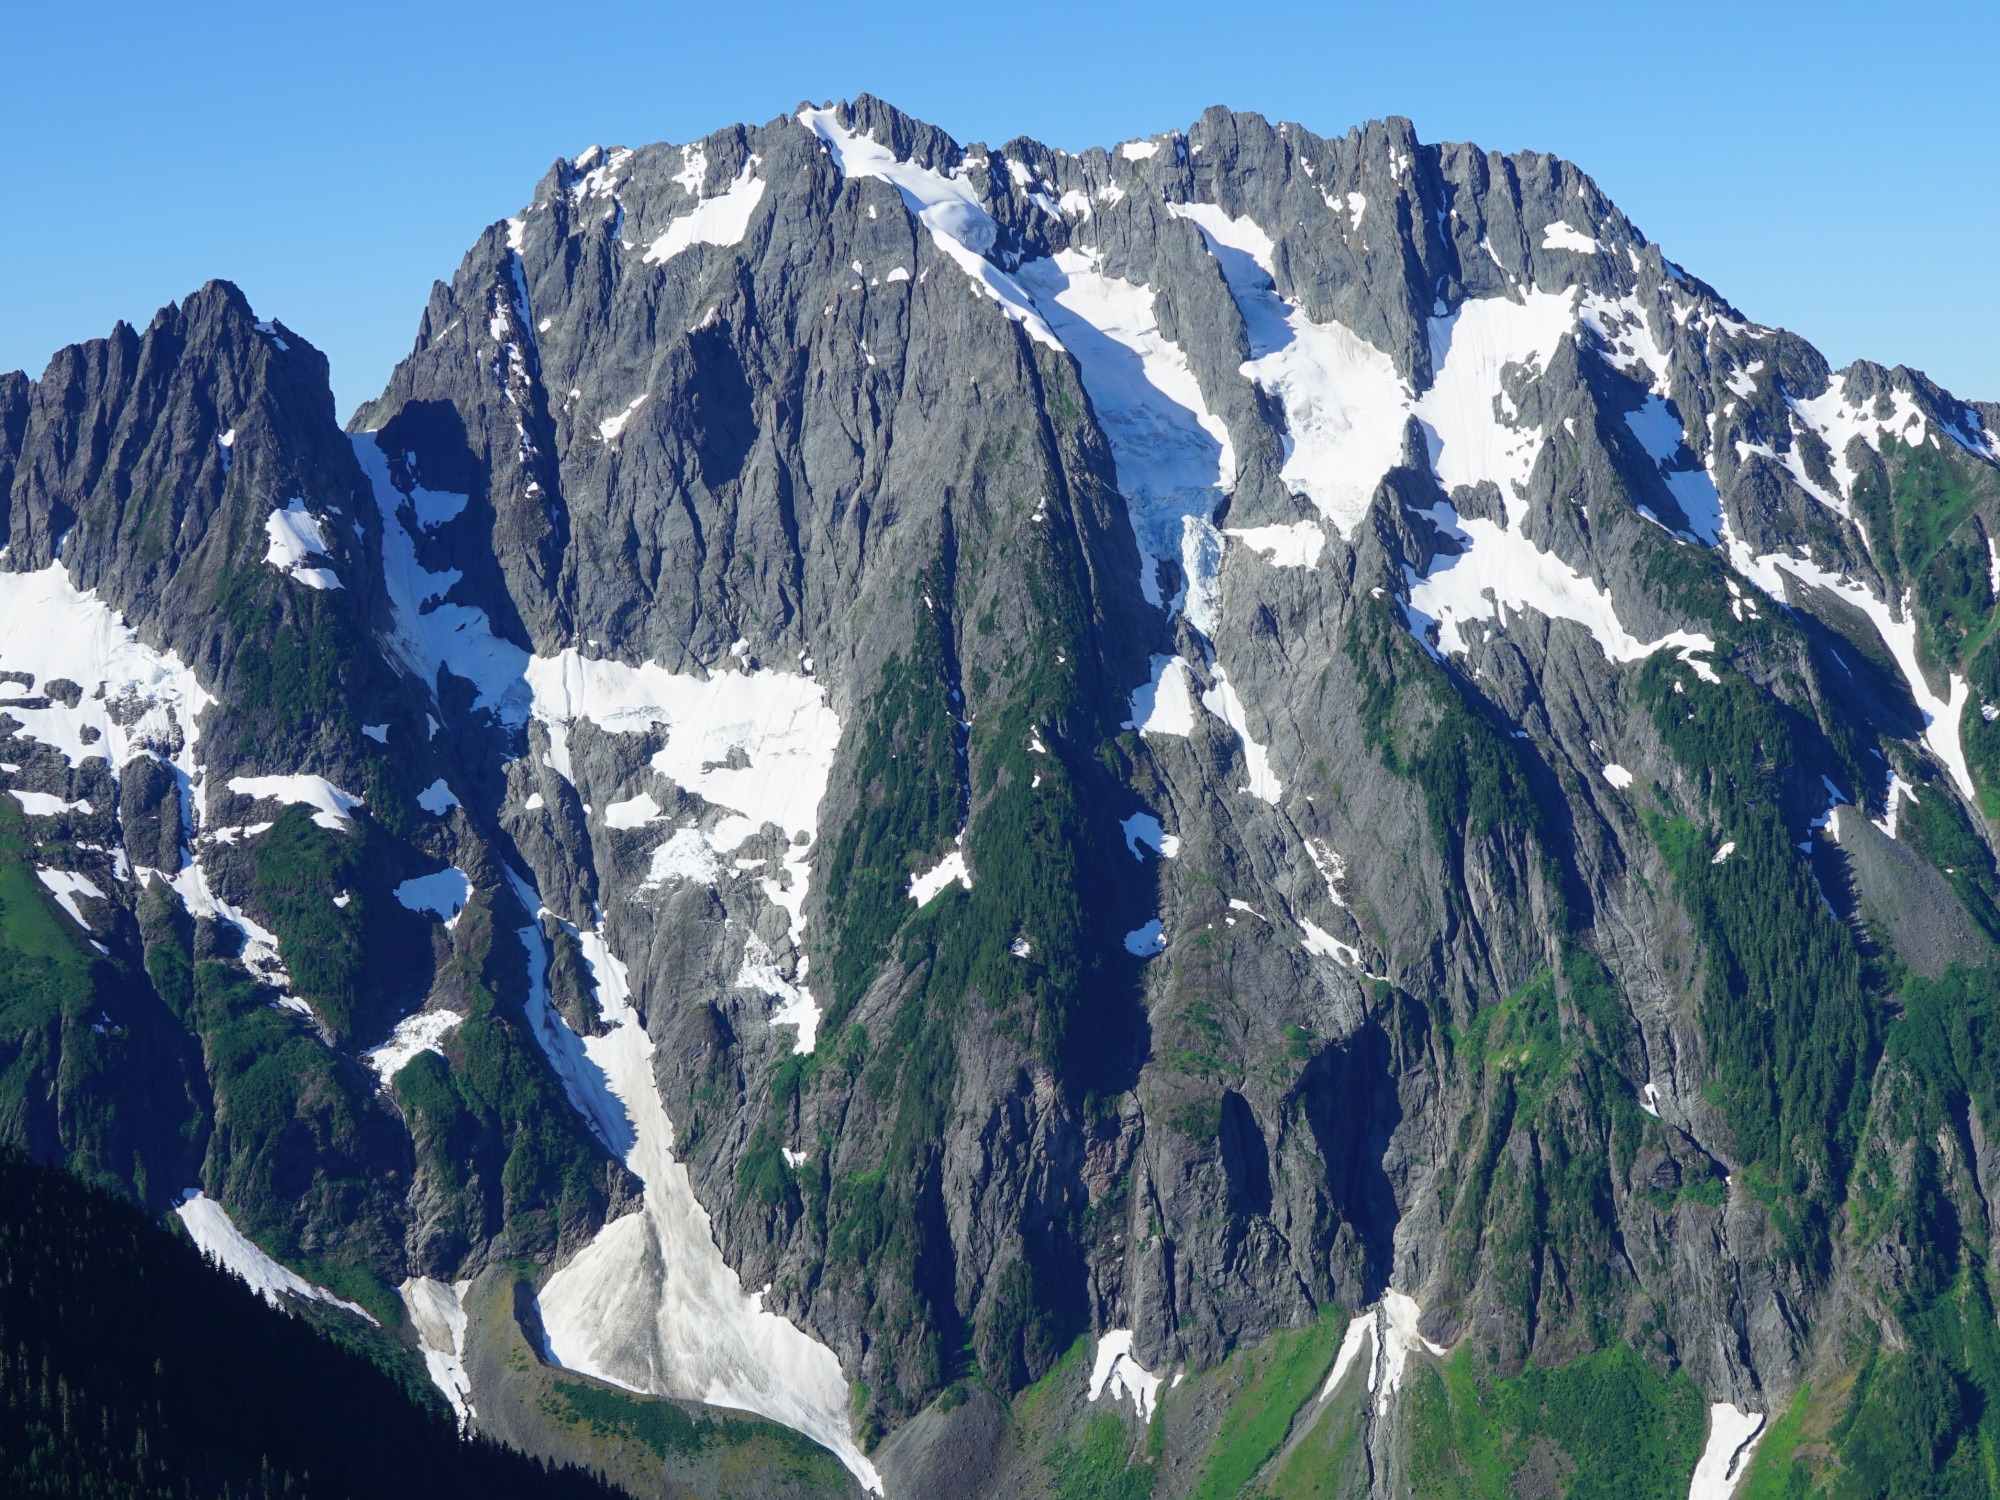
Johannesburg is a a beast of a mountain, lording over the head of Cascade River Valley with 5000′ of vertical relief from the summit to the valley floor. Despite the obvious appeal of such a complex face, and the lack of an approach hike, the mountain typically sees only 3-5 ascents per year* by any route. Johannesburg has a fearsome reputation among Cascades climbers; stories of loose rock, vertical bushwhacking, and a nightmarish descent abound. Everything you read about this route is true, but these factors combine to create a unique challenge.
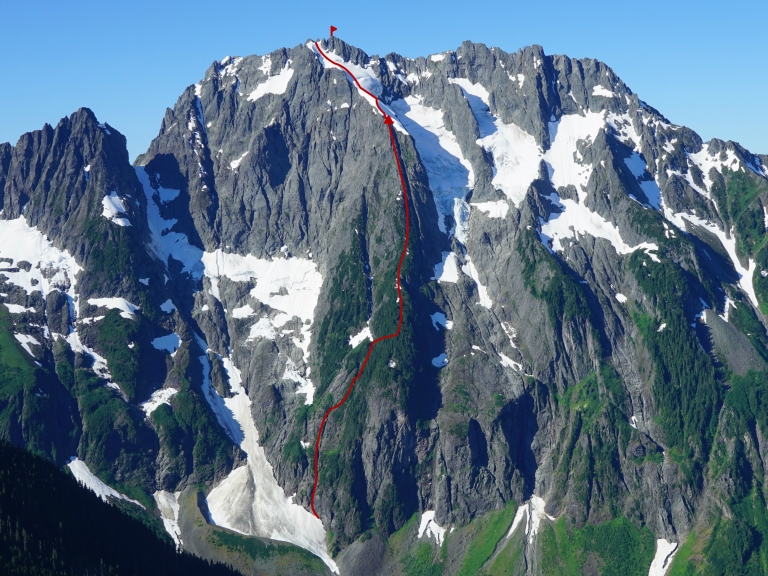
John and I took an open-minded approach to the climb, choosing to follow the best looking line rather than the route information we had. After leaving the car and making the quick approach, we downclimbed into the moat of an avalanche fan and gained the rock. Most teams start higher and to the left, following the 1951 start to the left of the major waterfalls. John and I chose to use a much lower start on the rock, far to the right of the waterfalls, where we could see a rib of golden rock rising from the snowfield. The 1951 start is a faster way to gain the rib proper, but it is less direct and has a scary 5.7 pitch to contend with. Once on the rock, we took off crampons and made quick progress on 4th class terrain. Things went smoothly for a few hundred feet as we romped upward. Before long, we found the steep tree climbing that the route is known for.

Once the trees begin, the climbing steepens and macro routefinding becomes impossible due to dense foilage, which prevents you from seeing anything more than a few feet away. Regardless, we pushed upward, climbing tree limbs and roots more than rock. This felt like playing in a very dangerous jungle gym! Eventually, we needed to cross a slabby gully to bypass a rock wall. Here, we roped up for a few pitches at about 5.5. I led the first pitch, requiring a slabby 60 foot horizontal traverse on rock with no protection until I finally found a tree root to sling on the other side. I had a rack of rock gear and I couldn’t even use it! I brought John up on an anchor made of equalized tree roots sticking out from nearly vertical dirt. We swapped leads on another two pitches before unroping and climbing to a snow bowl. This spot is where the 1951 and 1957 routes become more defined and diverge. The 1951 takes the left of two ribs that jut from the buttress, while the 1957 takes the more prominent right rib. We opted to quest straight up into the 1957 route.
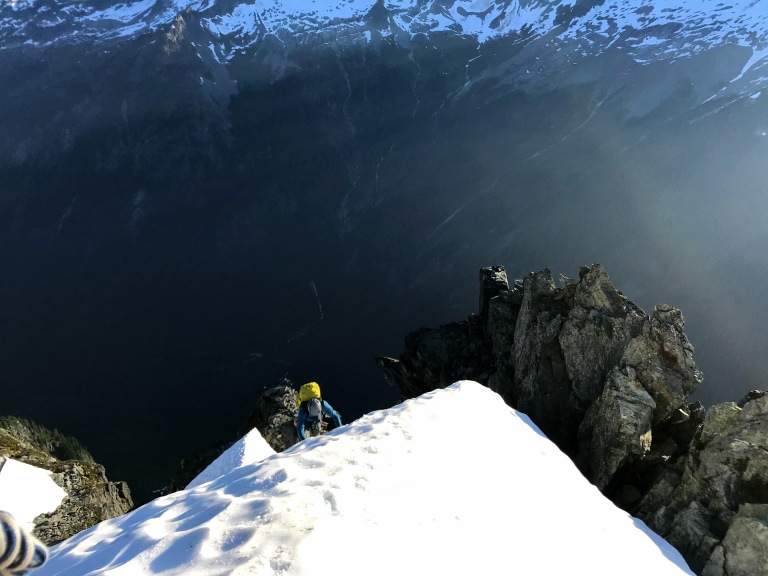
After climbing up from the snow bowl and running into an impassible rock wall, we made a hard traverse to the right until we found a spot where we would begin the crux of the tree climbing. Athletic moves, with all points on tree roots and branches, carried us higher on terrain that was occasionally vertical. A fall here would be lethal, so test pulls on the foilage were prudent to ensure they would support my weight.
The trees started to thin out, but next we had to climb incredibly steep heather. For each move, I would spread my fingers and push them into the heather before clenching my fist, trying to capture as much organic material as possible to use as a handhold. A gingerly step up would allow me to repeat the process. Needless to say, this was very stressful terrain and it wore on my nerves. It felt like something could go wrong at any moment.

Finally, we reached the point where the heather disappears and the climbing became ACTUAL ROCK CLIMBING. This ~700 foot section was a refreshing dose of fun! This is some of the only good climbing on the route. By “good climbing” I certainly don’t mean solid rock, but the position is great out on the rib. John and I roped up for a crux 5.6 section and kept the rope on for another two pitches until we hit the bivy site adjacent to the glacier two pitches higher.
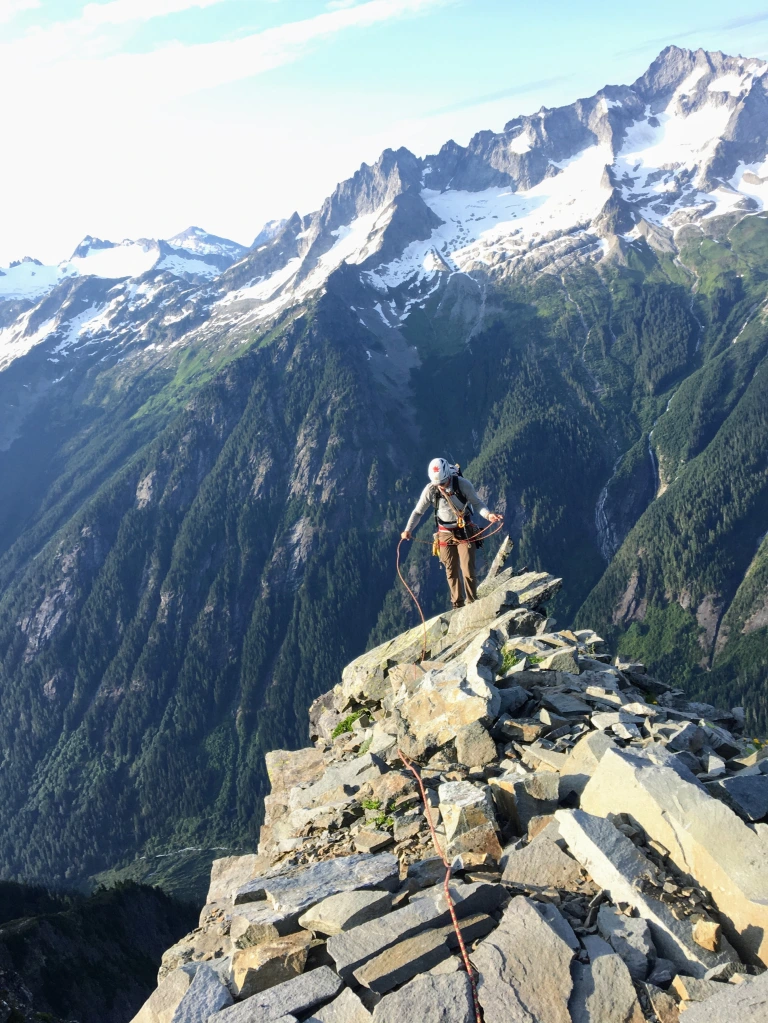
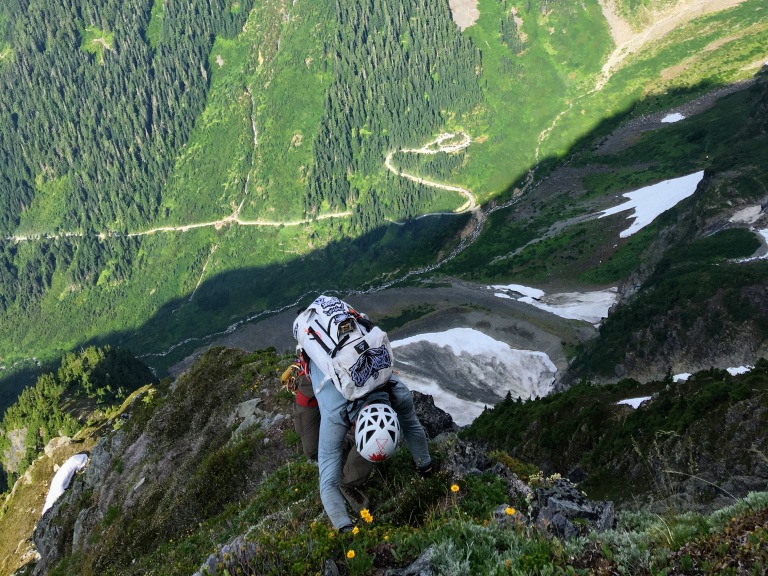
The bivy was incredible, with zero wind and warm temps. Looking down 4000 feet to the Cascade Pass Trailhead, I could clearly see my car – strange to think that I’d comfortably slept there the night before. Now, I may as well be on another planet. I couldn’t fall asleep easily, with the buzz of the day’s excitement keeping me wide awake. As the sun dipped behind Mt Baker, I was mesmerized by the gradual revealing of a brilliant starscape. Once the twilight faded, I could see headlamps all over the valley – each light representing someone having their own adventure. I ruminated on climbing and its place in my life. I also realized that I had climbed in North Cascades National Park for three of the last four weekends.

After a lazy wakeup, we got moving up the snow arete and glacier at 6:30am. There are a few steep sections on the glacier, and I was glad that I’d brought along a proper ice tool rather than my aluminum “toy” axe. John and I made our way up this section without a rope, completing the final 4th class scramble and reaching the summit at about 8:00am. I almost never sign summit registers, but this was not just your average climb. The summit register (really just some scraps of paper inside a metal tube) reads like a “who’s who” of Pacific Northwest Climbing, and I was proud to add my name to its pages. Amazingly, another team had summited the day prior via a combination of the 1951 and 1957 routes!


I felt some relief now that we were on the summit, but I should have been filled with dread for the descent to come. Things weren’t bad initially; we started with a long, almost horizontal 4th class traverse just below the crest of the East Ridge. The rock is pretty loose here and just like the day before, falling was not an option. The East Ridge eventually becomes more of a buttress as it sharply descends to the saddle between Johannesburg and Cascade Peak, referred to as C-J col. We did 8+ rappels and some downclimbing to arrive at the col – so far, so good.


After traversing underneath Cascade Peak and The Triplets, I pulled out my information on our chosen path to return to Cascade River Valley: Doug’s Direct. You don’t know heartbreak until you’ve climbed up and down Johannesburg before realizing that you have to climb 1600 feet up and over the North Ridge of Mixup Peak to use this descent option. This is a tough proposition, but Doug’s Direct is the fastest way back to the cars other than the seasonally dangerous C-J Couloir. Gunsight Notch adds some hiking, but appears to be a more mellow option for gaining the Cache Glacier.

Doug’s Direct is a three-part descent package. First, do some heinous sidehilling through fields of wildflowers until you gain some 45 degree heather slopes. Your already-sore ankles will be screaming through this section. The heather gradually steepens enough to get scary; a fall would send you tumbling down the massive heather slope that is interspersed with rocks. The heather reached 60 degrees here, requiring the use of ice tools, swung into the dirt. I wished that I wore my crampons, but now I was committed to the steep heather and there were no stances to put them on. I felt this was the most dangerous part of the trip, and I am surprised that I hadn’t read anything online about the sketchiness here. I didn’t put myself through all of this just to eat it in the home stretch, so I stayed focused and chose the best possible line (there aren’t any really good options). Thankfully, I nailed the navigation in this section and we crested the ridge exactly in the right spot.

We had a short lunch break on the North Ridge of Mixup before starting our descent to the Cache Glacier. As we downclimbed fourth class steps of rock, we had a close call with rockfall. The rock is generally pretty solid compared to much of what we’d seen, but there is still some looseness.

Thankfully, we reached the Cache Glacier without incident a short time later. From here, mellow glacier travel, a climber’s trail, and the well-maintained Cascade Pass trail took us back to the car. I feel that it is important to note that the Cascade Pass trail has a whopping 32 switchbacks right before reaching the trailhead – mind numbing! It’s much easier to walk in a straight line in an exhausted state. I nearly fell off the trail as I rounded one corner. Finally, we arrived at the cars, looking up at the face we’d spent the last two days climbing. Job done.
John hit the road home while I settled in for another night of solo car camping. I ate a meager dinner – I hadn’t expected the descent to take so long and thought I’d be grabbing dinner on the way home by this time. I relaxed in my sleeping bag on top of a picnic table and sipped a beer, reflecting on the experience I’d just had. There was very little “good” climbing up there – maybe none at all. The cumulative challenge of routefinding, risk management, varied climbing styles, and endurance make this a formidable challenge. I’m grateful that the mountain allowed us safe passage, and have a new respect for all who climb this face!
Strategy Notes
Don’t stress too much about beta – rely on your routefinding skills to make your way up. It is absolutely vital that you save the photos from Steph Abegg’s report that show the Doug’s Direct descent. The crossover is not obvious and we would have never found it without the all-powerful Abegg beta.
Gear Notes
Crampons, ice axe/tool(s), small rock rack, light rope. I used mid-top goretex approach shoes for the entire trip. Some will want snow protection for the summit glacier, and later in the season, ice screws and legit boots/crampons would be needed.

*I can’t believe you scrolled down to this asterisk. Anyway, I based this number off of my recollection of the summit register.

Awesome photos! Did you take them?
LikeLike
Thanks! All uncredited photos are by me.
LikeLiked by 1 person
That’s so cool! You’re a great photographer!
LikeLiked by 1 person
That’s some righteous writing of tales from above. Thanks for sharing for both enthusiasts and novices alike. Well done!
LikeLiked by 1 person
Thank you very much – glad you enjoyed it.
LikeLike
Really enjoyed reading your story and viewing the fine photos. That route was on my list back in the 1980’s and I always regret letting it slip away until your description. Reminded me some of my dirt eating adventure on the North Face of Big Four-in the amount of vertical jungle and steep heather. Thanks for the excellent write up. Good job on the mountain and in sharing the tale. Sincerely, Scott Schmidt
LikeLike
You’re welcome, Scott! I don’t think this is the genre of climbing that I will pursue, but the complexity of this mountain is irresistible.
LikeLike
So, did the lack of protection make you think the mountain would make a good solo?
LikeLike
No, the availability of protection is not something I consider when thinking about soloing a route.
LikeLike